Showing posts with label Online Card Classes. Show all posts

May 21, 2024

Extraordinary Embossing Folders Day 1


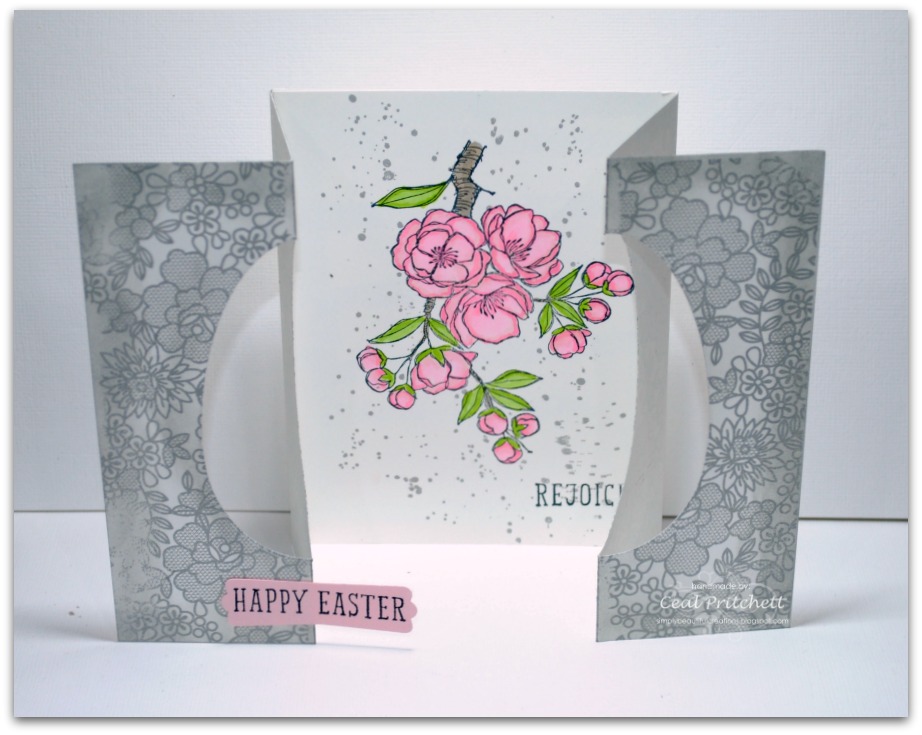
I am up on the CutCardStock blog today sharing this card. I am also taking the Extraordinary Embossing Folders class at  Online Card Classes and this card is from Day 1 of the class.

To create this card, I started with a precut and scored A2 card base and a precut panel. I stamped the sentiment first so I could use it to help line up the folders. I used two different 3D embossing folders one from Simon Says Stamp and one from Spellbinders. I spritzed the card front panel with water which makes it have a better impression and not crack the paper. To finish the card, I ink blended some ink over the embossed areas.


There is also a sale on Stardream Metallic cardstock and let me tell ya, it's gorgeous papers. 


Nov 9, 2022

Plaid


Hello and welcome to day 5 of my Christmas series, I can't believe that we are already five days in. 
Today's card is brought to you by Concord & 9th.


It's also day 2 for me in the Holiday Card Workshop.
To mae this card I started with a top folding white card base and a wheat panel. I used a turnabout stamp to create the plaid background and then stamped, embossed and die cut the sentiment. 
To finish the card I added accents using some gold and white pens.


May 27, 2022

Spring Card Camp Day 4


Todays card is for Day 4 of the Spring Card Camp (yep as usual I am behind). I used a layering stencil by PinkFresh Studio and a sentiment by Taylored Expressions.
If you haven't ever taken any classes from Online Card Classes, you should! 


Below you will find links to the products used. Click the picture to start shopping. Compensated Affiliate links are used at no additional cost to you. Your support helps me to keep bringing you new projects and I appreciate that so much!  

Thank you! 


May 4, 2020

Spring Card Camp - Day 9


Happy Monday and may the fourth be with you :)
Today's card share is for day 9 of the Spring Card Class 1. They are starting class two on Wednesday and I am only half way done with class one. 
I will continue to work on class one and two at the same time and see how that works. 


For these two cards I inked a stencil once and used it for a background twice, make the second card. Easy technique to get two cards out of one ink blending session.  I used the Funky Leaves Stencil by Picket Fence Studios and some distress inks.

Supplies are pictured below along with affiliate links with no additional cost to you but a small commission for me. thank you for your support! 


Aug 17, 2017

Day Two of Rainbow Maker


I had to move on to Day two of the Rainbow Maker card class, I don't think I will get done before the galleries close but at least I can get a few cards in there.
I am loving this class because I love rainbows and color so you will continue to see lots of color in the coming days as I finish the class.
This card uses the set Balloon Celebration and the Stylized Birthday sentiment both by Stampin Up. I randomly stamped the balloon across the top in rainbow order and as I stamped I also stamped a second generation as well.
I used the Creative Corners by My Sweet Petunia to help me line up the greeting since it is wood mounted.


Aug 16, 2017

Still Day One


Yep I am still on day one of the Rainbow Maker card class at Online Card Classes. 
Today I used the stamp set Lovely Friends by Stamping Up, Distress inks and lots of sequins.
This card was super simple to make, I stated with a top folding note card and a panel cut down with a stitched die. I sponged the colors around in rainbow order and then added sequins in the colors also.

This card is also for a team challenge #team15in15


Aug 15, 2017

Rainbow Maker Day One


I am taking a class at Online Card Classes called Rainbow Maker. Actually this class was all last week but schedule didn't allow me the time to work on any of the cards because I was super busy working on the Dare to Get Dirty challenge cards. So here is a card from Day one only 6 days late :)
This is a case of the card that Laura Bassen created in the class and let me tell ya hers looks way better than mine. 
To make my card I used a top folding note card and a panel cut down with a stitched die. For the balloons I used the new balloon die by Concord & 9th along with a stencil by Neat & Tangled. The happy is from the Happy Words set by Concord & 9th and the birthday is also by Concord & 9th from the Hooray set.
To finish off the card I added some clear sequins to give it a little sparkle.

I am also entering this one in the challenge of Anything Goes at 


May 2, 2016

Clear & Sheer Day 2


I am currently working on more May birthday cards and Mothers Day cards, so I am running behind in my homework for the card class I am taking at Online Card Classes so I thought that I would make it up by using one of the techniques on one of my mothers day cards. 
It is really hard to find colored vellum these days so Jennifer McGuire taught a technique to color your own vellum which I used here. To get this ombre' effect I used Watermelon Wonder and Flirty Flamingo dye inks from Stampin Up.
 The stamp set I used is one of my all time favorites from Sweet 'n Sassy Stamps, Precious Poppies. I stamped the poppy image with Versamark ink and embossed with white embossing powder, the sentiment was embossed in black. I framed it with the Scallop Frames die from Pretty, Pink, Posh.


Apr 27, 2016

Clear & Sheer Day 1


Starting a day late but I have signed up for the Clear & Sheer class at Online Card Classes. Today's class was all about ways to attach vellum because you and I know there is no vellum adhesive out there that don't show behind vellum.
To make my card I started with a piece of Watermelon Wonder cardstock and ran it through the striped embossing folder to give it some dimension behind my vellum piece. I stamped the large floral image from the Birthday Blooms set and colored it with Copic markers. I used a piece of printed vellum and stamped my greeting in Versamark ink and then heat embossed it with gold embossing powder. I attached my vellum panel with foam dots hidden underneath my image and with a piece of gold wash tape across the top.

I am entering this one in the Tic Tac Toe challenge at 
I went from top to bottom in the middle row


also at 

for their Anything Goes challenge


Happy Stamping!

Sep 22, 2015

Watercolor For Cardmakers ~ Day 1


I am taking the Watercolor for cardmakers - exploring mediums over at Online Card Classes and today's class was all about markers. For my card I used a Sweet n' Sassy image and greeting from the set Lovely Lotus and watercolored it using Tim Holtz distress markers. I stamped it with versamark ink and then embossed it with white embossing powder, this allowed me to stay inside the lines a little better. I die cut my panel and the frame from the Sunshine Layers die from Wplus9. 


I am entering this one in a  few challenges 

Simon Says Stamp Monday challenge
of Use a Stamp
also Simon Says Wednesday challenge 
of Die Crazy


and 
The Challenge inspiration challenge


Mar 24, 2015

You Amaze Me


Happy Monday!
Today's card share is for Day 20 for the 30 day coloring challenge at The Daily Marker and Online Card Classes Day 7 of Stretch Your Dies. This is a technique shown by Kathy Racoosin and I loved it, it's a subtle, but yet dynamic way to use your dies. The stamp I used is Pleasant Poppies, I stamp it with versa fine black ink and watercolored it with Koi watercolors. For the YOU, I used the Die-namics By The Letter from MFT Stamps. The greeting is from the set Crazy About You from Stampin Up

Mar 20, 2015

30 day Coloring Challenge - Day 16


Late night card for Day 16 of the coloring challenge at The Daily Marker. This is also for Day 4 of the online card class I am taking Stretch Your Dies.  Today's focus was mini dies and Jennifer Rzasa taught how to make a background out of them. I loved her card, so I made something similar. I used the mini party hats from Lil Inker and the Mini Balloons from Avery Elle. I started with Watercolor paper and Tim Holtz distress inks and ended up with this ombre look. The greeting is from a SU set, From The Herd.


Mar 18, 2015

Halfway There


It's day 15 for the 30 day coloring challenge that I am participating in at The Daily Marker, so I am halfway to the finish. I also made this card for the online class that I am taking, "Stretch Your Dies". Jennifer McGuire taught how to use your dies you have on hand to make a gate fold card. I needed to make some more easter cards, so I used an egg die from Memory Box and a few sets from Stampin Up, Indescribable Gift , Gorgeous Grunge 
and Something Lacy background stamp. I colored the image with Copic markers and the stamped the background in Smoky Slate, I didn't get a clean image on my background stamping so I sponged around the edges to hide my mistake. If I would have been able to use the MISTI this partial stamping would have not happened, but my background stamp is wood mounted. Since owning the MISTI, I now order my stamps in Photopolymer or cling mount.


Here is my card when opened

Let's Go Shopping!
Use Code ACH2MXDU thru 3/31