
Hello and welcome to day 1 of the collaboration hop with Picket Fence Studios and WOW Embossing Powders. You should have arrived here from Ericka's blog but if not there is a complete list at the bottom of this post.
My cards are two completely different cards but the WOW embossing powder gives each of them a sparkle.
PRIZES - No Blog hop is complete without a prize!
WOW! Embossing Powders is giving away a $25 gift certificate to either their UK or USA store.Picket Fence Studios is giving away a $50 gift certificate to their store.
The Winners will be chosen at random from the comments left on THE POSTS.
To join this GIVEAWAY you must leave a comment on each blog post to have a chance at getting your hands on the prize. This hop is open internationally.
Winners will be announced on May 11th on both company blogs.
Now for the deets on my cards.

To create my first card I started with a white top folding card base, a white panel the same size as the base (A2) and a panel of Bristol Smooth cardstock. I used the Roses stencil and masked off the leaves to the roses and then spread Snowdrop White Paper Glaze over each rose while it was still a little damp.
I added the Fairy Tale WOW embossing powder and then heat set it. I purposely left some of the snowdrop glaze showing on the roses.
Next I placed the stencil back over the roses and used the Life Changing Blender Brushes to add two different greens to the leaves. I removed the stencil and the placed the Fancy Flourish stencil over the front and very carefully blended some blue ink as a background.
I cut out the Hello word die several times using Bristol paper, embossed one of them with the Fairy Tale embossing powder and glued them all together for dimension. For the backer to the hello die, I used vellum and colored it using a Copic marker to match because the regular vellum blended in and was hard to see.
To finish the card I took embossing ink and the Fairy Tale embossing powder and created a mat for the focal panel by swiping the panel across the ink pad and embossing with the powder.

To create my second card I started with a white top folding card base, a white panel and a purple panel cut to the same size as the card base (A2) for a mat.
I blended the background using the Life Changing Blender Brushes and some distress inks.
I stamped the adorable mermaid from the I am A Mermaid set on watercolor paper, painted her using Daniel Smith watercolors and then cut her out with the Coordinating Die.
I Stamped A Bottomless Sea using embossing ink twice, once using the Calypso embossing glitter and the second time I used the Under The Sea. I added some seaweed from the Things on the Seafloor set and cut them out with the Coordinating Dies. To finish the card I popped up all the elements on the focal panel and added a greeting to let a special little girl know I miss seeing her.
Your next stop is the Picket Fence Studios blog where Michelle has some gorgeous projects to show you.
Here is the lineup for day 1
WOW! Embossing Powder Blog
Ashlee McGregor
Judy Rozema
Karen J Reategui
Ilina Crouse
Amber Rain Davis
Becky Roberts
Dunja Traumann
Angela Bode
Lisa Henke
Ericka Strange
Ceal Pritchett <<<---You are here
Picket Fence Blog - Michelle <<<<--- Next Stop
Ashlee McGregor
Judy Rozema
Karen J Reategui
Ilina Crouse
Amber Rain Davis
Becky Roberts
Dunja Traumann
Angela Bode
Lisa Henke
Ericka Strange
Ceal Pritchett <<<---You are here
Picket Fence Blog - Michelle <<<<--- Next Stop
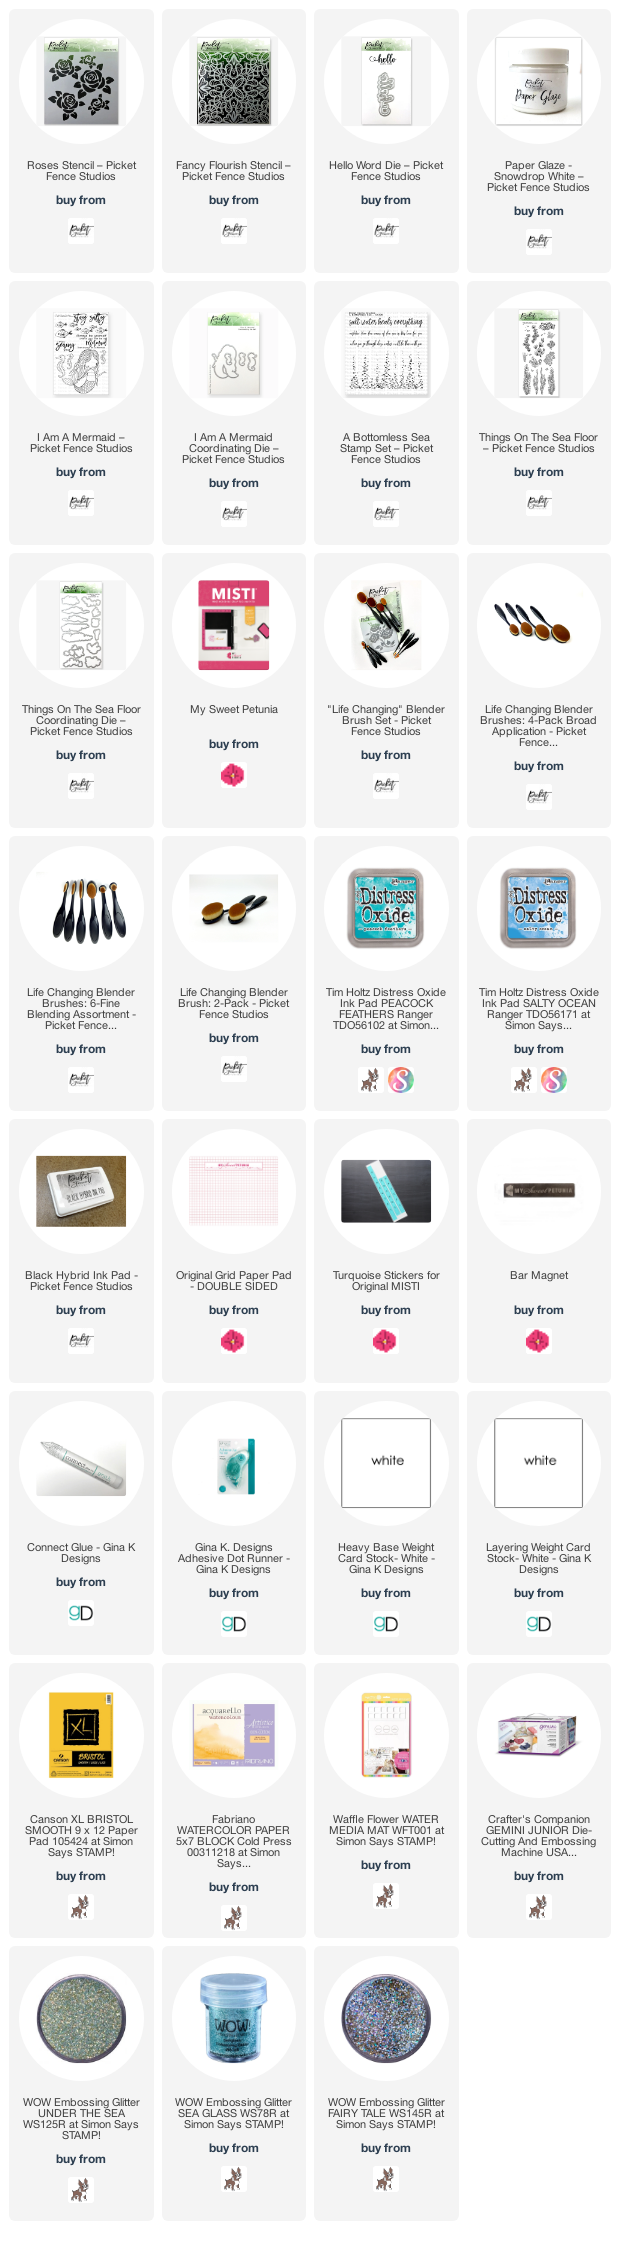
Supplies are pictured below along with affiliate links with no additional cost to you but a small commission for me. thank you for your support!

Hi Ceal!! Love your cards—as always:)
ReplyDeletebeautiful cards, I love what you did with the rose stencil, that's fabulous
ReplyDeleteLove your double stencil technique, Ceal. Gorgeous!
ReplyDeleteI love the cute mermaid!
ReplyDeleteHugs, Joy
So many steps in your first card!! The mermaid card is sweet!! I miss seaing YOU!!!
ReplyDeleteGreat cards! I love the way you added the embossing powder to the rose stencil, THEN went back & used ink. Thanks for the inspiration
ReplyDeleteBeautiful cards. Thank you for sharing.
ReplyDeleteSo pretty! I love seeing the creative ways these amazing products are used. Thanks!
ReplyDeleteSuch pretty cards, who doesn't love a mermaid, she's so cute.
ReplyDeleteThe roses are so pretty in the Fairy Tale powder and the mermaid is such a sweetheart. Thanks for sharing this inspiration with these fun products.
ReplyDeleteBeautiful and sweet cards! Fabulous backgrounds and lovely designs. I love how you combined Wow and Picket Fence Studio products.
ReplyDeleteSuch wonderful cards! Love the mermaid, so sweet.
ReplyDeleteThanks so much for sharing.
I LOVE BOTH! The mermaid scene is darling and I LOVE the silver in the first one!!!
ReplyDeleteOh how very lovely!
ReplyDeleteThese are so sweet, I especially love the mermaid card! :-)
ReplyDeleteGreat cards. The second sentiment is so perfect for what's happening right now. I miss seeing my friends. Your first card is very pretty and has a bit of a vintage vibe with that color of EP. Very pretty!
ReplyDeleteTwo fantastic card designs. Very different but both so well done.
ReplyDeleteBeautiful cards thank you for sharing them
ReplyDeleteYour first card is beautiful - love the shimmer! The mermaid card is so sweet - love the bubbles!
ReplyDeleteGood examples for use of the powders with stencils.
ReplyDeleteCards and embossing were amazing!
ReplyDeleteI am just enchanted with little miss mermaid! I love the blended background and the sparkly bubbles!
ReplyDeleteYour cards are so pretty! Thanks for sharing these embossing powders.
ReplyDeleteI very much enjoy your Hello card. Thank you for the inspiration!
ReplyDeletePretty colors and textures! Love the roses stencil and the Fairy Tale embossing powder.
ReplyDeleteAdorable mermaid scene you created also. So pretty with the sparkle and the colors you used!
Gorgeous cards. I really love the first one with stenciling. The flowers are pretty and I love the beautiful colors.
ReplyDeleteLove what you created!
ReplyDeleteEmbossing some of the flowers
ReplyDeleteand leaving others plain made
a fantastic card. Love the
little mermaid. thanks for
sharing. txmlhl(at)yahoo(dot)com
From peaceful to sweet. These are very pretty and love the sparkle on each! Thanks for the inspiration and please continue to stay safe!
ReplyDeleteThat's a mermaizing cards with awesome scene building
ReplyDeleteThe glaze and sparkle on first card is awesome.
ReplyDeleteLove the rise stencil and how the show embossing powder just transforms it
ReplyDelete. So beautiful ❤️
Am so happy that you used the mermaid!!! She and WOW are a perfect match!! Ceal, are there any talents you don't possess?!!!! Your cards a delight to see!
ReplyDeleteWOW - WONDERFUL cards!
ReplyDeleteLOVE your CUTE mermaid, ADORE your STUNNING hello, the stencilled panel looks GORGEOUS with heat embossed roses and ink blending, the sentiment layered with the vellum is the PERFECT finishing touch!
Your mermaid card is just adorable, and I love the double stencilling on your first card.
ReplyDelete